Hosting multiple node sites on Scaleway with Nginx and Lets Encrypt
Two years ago I wrote a blog post about hosting Node.js servers on Scaleway. I have now started using Nginx to allow me to host multiple sites on one €2.99 a month server.
This tutorial will help you build a multi site hosting environment for Node.js servers. We are going to use a pre-built Ubuntu server image from Scaleway and configure Nginx as a proxy. SSL support will be added by using the free letsencrypt service. I have written this post to remind myself, but hopefully it will be useful to others.
Setting up the account
- Create an account on scaleway.com – you will need a credit card.
- Create and enable SSH Keys on your local computer, scaleway have provided a good tutorial https://www.scaleway.com/docs/configure-new-ssh-key/. It's easier than it first sounds.
Setting up the server
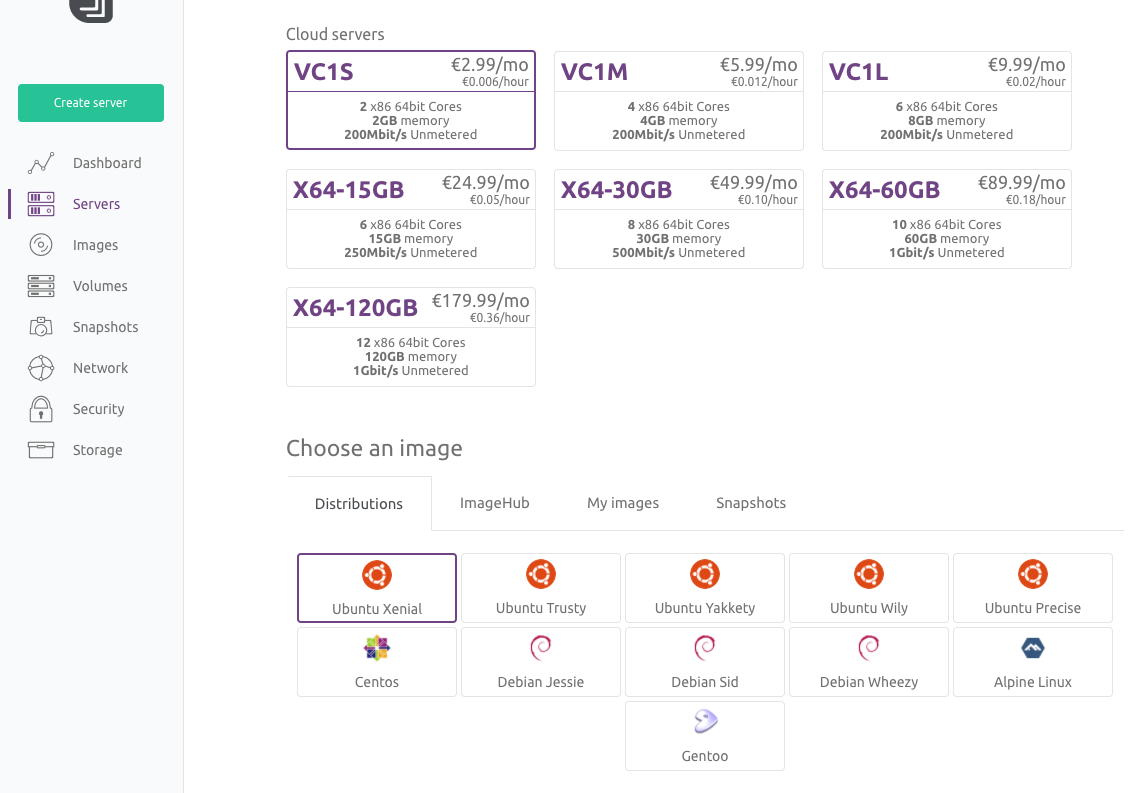
Scaleway provides a number of server images ready for you to use. There is Node.js image but we will use the latest Ubuntu image and add Node.js later. At the moment I am using VC1S servers which is a dual core x86.
- Log into the Scaleway dashboard and click “Create server”
- Select the VC1S server and the latest Ubuntu image currently Xenial.
- Finally click the "Create Server" button.
- Within the scaleway dashboard navigate to the "Servers" tab and click "Create Server".
- Give the server a name.
- Select the VC1S server and the latest Ubuntu image currently Xenial.
- Finally click the "Create Server" button.
It takes a couple of minutes to build a barebones Ubuntu server for you.
Logging onto your Ubuntu server with SSH
- Once the server is setup you will be presented with a settings page. Copy the "Public IP" address.
- In a terminal window log into the remote server using SSH replacing the IP address in the examples below
with your "Public IP" address.
If, for any reason you changed the SSH key name from id_rsa remember to provide the path to it.$ ssh root@212.47.246.30$ ssh root@212.47.246.30 -i /Users/username/.ssh/scaleway_rsa.pub
Installing the Node.js
We first need to get the Node.js servers working. The Ubuntu OS does not have all the software we need so we start by installing Git, Node.js and PM2.
- Install Git onto the server - helpful for cloning Github repo's
$ apt-get install git - Install Node.js - you can find different version options at github.com/nodesource/distributions
curl -sL https://deb.nodesource.com/setup_6.x | sudo -E bash - sudo apt-get install -y nodejs - Install PM2 - this will run the Node.js apps for us
$ npm install pm2 -g
Creating the test Node.js servers
We need to create two small test servers to check the Nginx configuration is correct.- Move into the top most directory in the server and create an apps directory with two child directories.
$ cd / $ md apps $ cd /apps $ md app1 $ md app2 - Within each of the child directories create an app.js file and add the following code. IMPORTANT NOTE:
in the app2 directory the port should be set to 3001
const http = require("http");
const port = 3000; //3000 for app1 and 3001 for app2
const hostname = '0.0.0.0'

http.createServer(function(reqst, resp) {
    resp.writeHead(200, {'Content-Type': 'text/plain'});
    resp.end('Hello World! ' + port);
}).listen(port,hostname);
console.log('Load on: ' + hostname + ':' + port);
NOTE You can use command line tools like VIM to create and edit files on your remote server, but I like to use Transmit which supports SFTP and can be used to view and edit files on your remote server. I use Transmit "Open with" feature to edit remote files in VS Code on my local machine.
Running the Node.js servers
Rather than running Node directly we will use PM2. It has two major advantages to running Node.js directly, first is PM2 daemon that keeps your app alive forever, reloading it when required. The second is that PM2 will manage Node's cluster features, running a Node instance on multiple cores, bringing them together to act as one service.
Within each of the app directories run
$ pm2 start app.js
The PM2 cheatsheet is useful to find other commands.
Once you have started both apps you can check they are running correctly by using the following command:
$ pm2 list

At this point your Node.js servers should be visible to the world. Try http://x.x.x.x:3000 and http://x.x.x.x:3001 in your web browser, replacing x.x.x.x with your servers public IP address.
Installing and configuring Nginx
At this stage we need to register our web domains to using the public IP address provided for the Scaleway server. For this blog post I am going to use the examples alpha.glennjones.net and beta.glennjones.net
Install Nginx
$ apt-get install nginx
Once installed find the file ./etc/nginx/sites-available/default on the remote server and change its contents to match the code below. Swap out the server_name to match the domain names you wish to use.
server {
    server_name alpha.glennjones.net;

    location / {
        # Proxy_pass configuration
        proxy_set_header X-Forwarded-For $proxy_add_x_forwarded_for;
        proxy_set_header Host $http_host;
        proxy_set_header X-NginX-Proxy true;
        proxy_http_version 1.1;
        proxy_set_header Upgrade $http_upgrade;
        proxy_set_header Connection "upgrade";
        proxy_max_temp_file_size 0;
        proxy_pass http://0.0.0.0:3000;
        proxy_redirect off;
        proxy_read_timeout 240s;
    }
}

server {
    server_name beta.glennjones.net;

    location / {
        # Proxy_pass configuration
        proxy_set_header X-Forwarded-For $proxy_add_x_forwarded_for;
        proxy_set_header Host $http_host;
        proxy_set_header X-NginX-Proxy true;
        proxy_http_version 1.1;
        proxy_set_header Upgrade $http_upgrade;
        proxy_set_header Connection "upgrade";
        proxy_max_temp_file_size 0;
        proxy_pass http://0.0.0.0:3001;
        proxy_redirect off;
        proxy_read_timeout 240s;
    }
}
Test that Nginx config has no errors by running:
$ nginx -t
Then start the Nginx proxy with:
$ systemctl start nginx
$ systemctl enable nginx
Nginx should now proxy your domains so in my case both http://alpha.glennjones.net and http://beta.glennjones.net would display the Hello world page of apps 1 and 2.
Install letsencrypt and enforcing SSL
We are going to install letsencrypt and enforcing SSL using Nginx rather than Node.js.
-
We start by installing letsencrypt:
$ apt-get install letsencrypt -
We need to stop Nginx while we configure letsencrypt:
$ systemctl stop nginx -
Then we create the SSL certificates. You will need to do this for each server, so twice for our example:
$ letsencrypt certonly --standaloneOnce the SSL certificates are created. You should be able to find them in ./etc/letsencrypt/live/
-
We then need to update the file ./etc/nginx/sites-available/default to point at our new certificates
server { listen 80; listen [::]:80 default_server ipv6only=on; return 301 https://$host$request_uri; } server { listen 443; server_name alpha.glennjones.net; ssl on; # Use certificate and key provided by Let's Encrypt: ssl_certificate /etc/letsencrypt/live/alpha.glennjones.net/fullchain.pem; ssl_certificate_key /etc/letsencrypt/live/alpha.glennjones.net/privkey.pem; ssl_session_timeout 5m; ssl_protocols TLSv1 TLSv1.1 TLSv1.2; ssl_prefer_server_ciphers on; ssl_ciphers 'EECDH+AESGCM:EDH+AESGCM:AES256+EECDH:AES256+EDH'; location / { # Proxy_pass configuration proxy_set_header X-Forwarded-For $proxy_add_x_forwarded_for; proxy_set_header Host $http_host; proxy_set_header X-NginX-Proxy true; proxy_http_version 1.1; proxy_set_header Upgrade $http_upgrade; proxy_set_header Connection "upgrade"; proxy_max_temp_file_size 0; proxy_pass http://0.0.0.0:3000; proxy_redirect off; proxy_read_timeout 240s; } } server { listen 443; server_name beta.glennjones.net; ssl on; # Use certificate and key provided by Let's Encrypt: ssl_certificate /etc/letsencrypt/live/beta.glennjones.net/fullchain.pem; ssl_certificate_key /etc/letsencrypt/live/beta.glennjones.net/privkey.pem; ssl_session_timeout 5m; ssl_protocols TLSv1 TLSv1.1 TLSv1.2; ssl_prefer_server_ciphers on; ssl_ciphers 'EECDH+AESGCM:EDH+AESGCM:AES256+EECDH:AES256+EDH'; location / { # Proxy_pass configuration proxy_set_header X-Forwarded-For $proxy_add_x_forwarded_for; proxy_set_header Host $http_host; proxy_set_header X-NginX-Proxy true; proxy_http_version 1.1; proxy_set_header Upgrade $http_upgrade; proxy_set_header Connection "upgrade"; proxy_max_temp_file_size 0; proxy_pass http://0.0.0.0:3001; proxy_redirect off; proxy_read_timeout 240s; } } -
Finally let's restart Nginx:
$ systemctl restart nginxNginx should now proxy your domains and enforce SSL so https://alpha.glennjones.net and https://beta.glennjones.net would display the Hello world page of apps 1 and 2.
Letsencrypt auto renewal
Let’s Encrypt certificates are valid for 90 days, but it’s recommended that you renew the certificates every 60 days to allow a margin of error.
You can trigger a renewal by using the following command:
$ letsencrypt renew
To create an auto renewal
-
Edit the crontab, the following command will give editing options
$ crontab -e -
Add the following two lines
30 2 * * 1 /usr/bin/letsencrypt renew >> /var/log/le-renew.log
35 2 * * 1 /bin/systemctl reload nginx
Resources
Some useful posts on this subject I used